Wednesday, February 21, 2018

Sending hedgehugs stamp set and the Magic Slider die

Here are the results of my brand new KLawn Fawn (LF) magic slider die set and their "Little Hedgehogs" stamps set.  I've also used some of the stitched clouds border dies and the back drop is their stitched clouds background die.  Those three little additional clouds came from the LF Some Bunny  Loves You" stamp set.  I guess, I really should be taking photos as I make the cards, but I'm new to this whole blogging thing and learning how to post my projects so I am no longer simply toiling away in obscurity (ha, ha, right!).
 Here is the effect of the magic slider when you pull on the top.  The coloring behind there is done with several Ranger/Tim Holtz Distress Oxide Inks and the eloquently named "smooshing" technique.
 I'm not sure if the video will play on a blog post?  I know it does on my Pinterest Board somehow.  Those clouds are made with Neenah metallic paper in white frost and silver.  It looks kinda bluish on the card, so it's perfect.  The background blue paper that's done with the stitched cloud background is from my stash and probably Bazzill brand.  The inking on the Dura-Lar .005 clear film acetate sheet was done with Staz On in Black and I used that again on outside for that super cute sentiment. 
The whole magic slider section also comes out of the clouds and can be a source of endless amusement for the little ones.
Hope you enjoyed the card.  I'm now going to see if I can get that little video to get put up on YT.
Hugs,
Nina

Sunday, February 11, 2018

The Last of My Christmas Cards were done just in the Nick of time for mailing!

These were done just in the Nick of time by December 15th , 2017 (Pun intended)!  But, then, I had to brave the long lines at the USPS to get them into the mail!  
This first one has the birch trees that are the cut outs (left overs) from the Ranger Tim Holtz Birch Trees background die.  It was cut out of some black paper that I had sprayed with some Heidi Swapp's Color Shine in Tinsel color.  I then used the Lawn Fawn stitched border dies with sparkle paper to create the snow drifts that the stag is standing on.  The stag was die cut from red glitter paper (DCWV brand) and that is all to this one.
Here is another attempt at a shaker card that turned out pretty good, although I wish the "guts" would stay inside the card. I used some crystal snow also for fill with some iridescent sparkle sequins.  It was easy to add the little die cut of the birds in the bush with rhinestones for their eyes.

 Now, this is one that I am very proud of.  It mostly uses some Memory Box dies (treeline and snow).  Then, a simple addition of the SUp silver cord with the hanging snowflake (also S Up) and finally the tag with Merry Christmas stamped on it.
This one below is also using one of the Memory Box snowflake edge dies to create a bi=fold card.  It started with a background made with inking Distress Inks onto some Cranson Watercolor paper and then embossing that with the snowflake background die from Frantic Stamper.  The jolly little Santa, bunny and snowman, I think, are from a Lawn Fawn "Christmas Friends" stamp and die set.  These were simply stamped, colored, die cut, and stuck onto the snow drifts cut out with that Lawn Fawn stitched hillsides die.  One small Darice "Let it Snow" die cut on Neenah White Frost 80# paper and set off  with a S Up snowflake jewel just finishes it up.

 Here is the effect when it is closed.  I did end up tying a small satin ribbon to keep the flaps closed for mailing.
 On the following card, I got out my S Up Christmas Ornaments and used the gold metallic mirror paper (Tonic Studios) to cut out the outer shadow and red mirror paper for the internal filigree part of ornament.  The red mirror paper also backs up the SpellBinders edge die cut twice from the card base.  Then I placed the stamped sentiment onto the gold glitter paper (DCWV) and the little red Cardinal bird was the last item to grace this card.
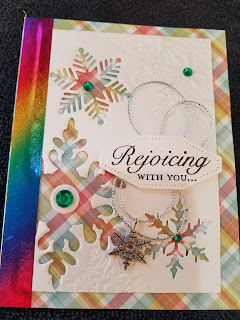
 Wow, look closely , I used some of the foiled rainbow washi tape on the left side of this card.  Washi tape?  Yes, that stuff that I've been collecting for a while now (hoarding?).  I used the My Favorite Things snowflake dies to cut into then also to emboss upon the white card stock and placed it onto the plaid paper card base.  Again with the S Up silver cord wadded up behind the sentiment stamp.  The little charm is also a S Up item.
 Now, this card was a total cheat!  The reindeer is just so adorable, right?   I used a tag off a present from last year and added the S Up "fa la, la" die .  The background snowflake die is from Frantic Stamper - Pinprick Snowflake Background.  Red mirror backing paper is from Tonic Studios.  One small green bow tie and he's ready to party!
 Here is a great elegant card that is actually not as hard as it looks.  Below, I cut the ornaments die out twice from black and gold mirror card stock (it's from Elizabeth Craft Design).  The card base &  one layer of the backing is Bazill textured 65# red paper and Neenah Solar White 80# paper.  Then, I switched out the insides of each die to get two different cards and also I doctored up the big ornament with some craft jewels .  The pine branches got the same double cutting treatment in two colors so as to add some depth and dimension.  More washi tape at bottom and I'm done.
 Here, I mainly just using a Spellbinders Card Kit of the Month from Last Nov. (2016) and an easy card idea they had.  If you've never tried one of their kit clubs, you ought to give them a whirl.  They really have thought of everything down to the card bases and envies.  The two little touches that are all my own are the little Santa stamped and die cut from that Lawn Fawn set and he absolutely just cracks me up!  I believe that I also sprayed that white doily so it was not stark white.
 Ok, this was an attempt to use up the remainder of that plaid paper from that snowflake card  up above.  I had it sitting on my desk and just couldn't bear to toss it out!  Another sprayed doily and the simple holly leaves with inlaid colorful metallic papers are all that was necessary to finish this one up.  The sentiment is from a S Up set.
 Ok, who said we have to stick to traditional colors for our Christmas cards, certainly not me.  I did another shaker but this time I used bigger shaker "guts" and was pleased that they remained inside the body of the shaker element.  The die is from Memory Box "Butterfly Swell".


 My goodness,what a long post!  Below is my lame effort at heat embossing in black a stamp and then water coloring on it  (using Stratmore Watercolor Cold Press 140#  paper).   That is very nice absorbent paper and takes a lot of warter before it gets saturated.  I also used Imagine Crafts Pico Embellisher as an extra layer of resist on the flower outlines.  I think it is really hard to water color and I'm not at all proficient at it. I used my Koi 18 pan min palette and also the golds from Metallic collection of colors by Ghansi Tambi for the shimmery effect they lend.

Saturday, February 10, 2018

More Valentine's Day card ideas to share.

Boy, I guess I've been busy making these since the beginning of January.  I didn't realize how many I'd made.  As they say, time flies when you're crafting.
The first two are using a die and stamp set from Art Impressions and are slider card style.  There is a pull tab on the right and when extended out the lady mouse slides over to hug the gentleman mouse.  Cute!  The stamps and dies are so adorable, I'm glad I remembered to use them finally.  The papers just came from my stash.


Ok Now this one took a long while as it first had to have images stamped , then colored in, then, all the items die cut and lastly, everything was assembled.  It was my first effort at using my new shadow box dies from Lawn Fawn (LF) as well as their "Somebunny" die & stamps set.  There are also LF grass die cuts inside.  The card folds flat for mailing--love this.  The heart is another die that I had just laying about.  Since the shadow box needs a window, I thought to try using that heart die.

The next card below is so simple and easy, it was just what I needed after all the time and effort on the prior one.  I sprayed the doily with some Lindy's Stamp Gang sprays first, then attached a Eiffel Tower with a small heart which I cut using my Silhouette Cameo and tried a bit of Stamping Up gold cord around it.  The paper off to the right side is also Stampin' Up DSP called, "Painted with Love" paper.
 This next card was a doozy.  I had it on my desk and worked on it from time to time and kept thinking it was finished, but then maybe it needs just one more thing....
 Next, I sprayed a tag with a die cut on it to use as a cheap but effective stencil and then layered up with the filigree die and the word "love" die cut from sparkly glitter paper.
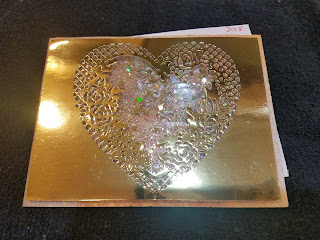
 I tried my hand at a shaker card and it was a blast.  You can hardly believe how magical this looks in person, the picture is not going to do it justice at all.  I think I need to get some larger sequins to fill the next shaker card I make.  These are too tiny and some of the glitter filling the inside actually found an escape route outside!  Even though, I thought I'd secured the area containing the shaker "guts", the glitter was too tiny to be contained and shook loose.  Oh, well, live and learn.  That's it for now, catch you later--

Friday, February 9, 2018

Some Valentine's Day Cards

Here are some of the many cards I've been busy making since the beginning of the year.  This first one was done with the heart hot air balloon cutting die cut in two colors of mirror paper.  The "Love" word was cut from Elizabeth Crafts mylar Shimmer Sheetz in purple.
 This one below was my attempt at trying to make it vintage/shabby chic.  It is certainly shabby, but not so chic!
 This one came together very easily with the special background die and the sentiment dies.  One bow to cap it off was all it took to be done.
 Now this one below took me a long while it started with some Stampin Up papers and the stamped words "is in the air".  Next came the little heart doily that I had sprayed with many colors of Lindy's Stamp Gang Moon Shadow Mist sprays.  A die cut of the word "Love" seemed to fit nicely. Then I had to paint the little wooden heart with some Faber Castell 3D stamp paint in Carmine Red-metallic to match.  The burlap heart was also sprayed the night before and so it was put to good use.
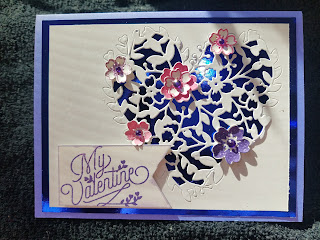
 Another use of my Stampin Up stamps (Bloomin' Love) and matching dies (Bloomin' Hearts).  I've owned this set for at least a year and have not used it much at all.  This is just cut in white paper then backed up with a bit of mirror paper and finally the sentiment is cut like a banner and set in left corner.  Simple and elegant.
 This uses a beautiful die as the basis (Birch Press Designs Amour Background Plate Layer A).  Then two little butterflies were all that was needed to set it off.  I forgot to add the sentiment stamping to the lower portion of card--oppps.
 Yes, now withthe card below,  I've used the Stampin Up set three times in past year!  Woot, woot!

Claiming it on Bloglovin

<a href="https://www.bloglovin.com/blog/20588129/?claim=snqscfx3kga">Follow my blog with Bloglovin</a>