Monday, May 28, 2018

Cake Soiree Shaker Cards

I wanted to use my Stampin Up Cake Soiree stamp set today and make some shaker cards so, I started with die cutting out the cake from 80# Neenah Classic Crest Solar White paper.   The birthday cake with candles die was from AliExpress and is unbranded.   I was going to use the die within the outline, but then it just seemed too crowded on top of that flower & butterfly printed paper.


Then I did the stamping onto that white paper using my Hampton Art and Tim Holtz Stamp Platform to get the little flowers onto the edge of the cake. 


I used many of my markers to color the tiny flower stamps.  The water based Marvy Uchida 1500 Brush Tip Markers.  It has been many years since I used these but they still work well.  I love markers and own many of them.  Water based, dye based or alcohol based, I love them all.

I also stamped onto a couple of backing papers which will be used behind the shaker element to be revealed when the recipient moves the card about.  The sentiment was stamped in Onyx Black VersaFine Ink, just to keep things simple.  Then, I cut it out with a simple scalloped oval.  
Next, I placed a double layer of 3M foam tape.  I bought the humongous roll about three years ago and it is only half gone.   I decided to fill the shaker part with sequins of many random colors instead of  trying to pick through and just use a few select colors of sequins.

The next step was to cut our some roses to place onto the cake and add a bit of flair to the card. It was a pain in the A** to cut the little flowers away from the rest of the bouquet.  I just stuck the colored ones onto the green bouquet spray and then it turned out that it looked better without much of the greenery attached.  On the two cards, I used it both ways to make them a bit different. 


 I also used some of the new Silver Metallic Offray Ribbon I picked up some where to add additional dimension.  The ribbon is only 1/8 inch thick so it was hard to make those tiny bows! 


For the inside, I wanted to use my Sizzix/ Tim Holtz Mixed Media #5.  These dies only cut out the interiors of the images and leave the exterior cuts untouched.  They were cut from 80# Neenah Classic Crest Solar White paper.   This makes it easier to add my comments to the cards as it presents a white surface on which to write.  


That's it for today!  Thanks for coming by.

Hugs,  Nina


Saturday, May 19, 2018

Simple Birthday Blossoms Flip Card

I've been wanting these Stampin Up! Birthday Blossoms stamp set for a long while and I finally got them!  I also have been coveting some of the fancy "Flip Card" dies that are out there and I was thinking maybe I could actually use my own vast supply of nesting dies to do this.  I figured it it basically just half the die cut out and the smaller die cut in a coordinating paper to fit on top to dress it up.  I used my good ole' Darice Nesting Wavy Circles Die set.  I set it up on the Sizzix Big Shot so
that only half the die was cut.  I did not place the top cutting plate over the entire die- just half the die.

 After adhering the green smaller die cut onto the front, I tried stamping on the card front, I found out that was a baddddd idea!  Due to the different heights, there is a halo effect and some of the stamped image just won't transfer.  No matter how hard I tried to press and how often I did so.  Now, I get why other paper crafters never do ti this way.  Well, sometimes a lesson I learn the hard way; is a lesson that sticks.  Plus, even though the linen textured card stock is nice, it is not what you want to use when you plan on stamping directly on it. FAIL!


Then, to fix my problem here, I also stamped with a few colors of Wendy Vecchi Ranger Archival Ink onto a separate piece of smooth paper that I fussy cut out later to use as decoys on the front which was so messed up.  I am always reluctant to throw the card base away and I wanted to come up with a way to disguise the errors.  I figure no one will notice if I draw the eye to the other items on front.  I also had a boo boo to conceal down near the bottom of the card front. Right??


So, I decided then to stamp more on the inside as well, as these stamps were the only embellishments I was going to have on card.
Now, we can be done.  Since, I messed up on it, I had to re-stamp the interior sentiment, I just did a cut and paste to keep it simple and easy.  

The inside:
Now, I'll add a few drops of Nuvo Glitter Drops.  And I'm all done. 
Thanks for visiting,
Smiles,
Nina

Tuesday, May 15, 2018

A Wedding Card for a Special Bride

My Nephew is marrying a great gal and she is a special lady.  Needless to say, he bought her a gorgeous blue diamond for her wedding ring.  It is the most stunning thing I've seen in a long while.  When I thought of them getting married, I thought of that ring.  I wanted to replicate it on this wedding card so they'll know it was handmade by me for them.  Of course, they can tell most likely anyway, but just to be sure.


I bagan with use of the Tim Holtz Sizzix 3D Embossing Folder --Flowers.  I first misted the Neenah Classic Crest 110# paper in Solar White on front and back with water to soften up the paper fibers so they bend and don't break when run through the Sizzix Big Shot Machine that embossing folder does it's thing.  I thought I may use the extra thick 65# Core'dinations Premium Vellum to cover part of the embossed paper, but in the end, I did not do so.  

I wanted to add the cut out from the Unbranded Mr & Mrs Die Set somewhere on the card front or interior, so I took the time to cut that out too.


I did use the Unbranded large diamond die set for cutting out of the large sized stone in the ring.  I then had to cut away some parts of the original stone found in the Two Wedding Rings die cut so I could then place the one I cut from DCWV Blue Glitter paper in there instead.  


There was yet another cute die that I had in my stash that I wanted to use. It is two Love Birds- the Bride and Groom inside a floral heart shape. Now, there was a big problem as there were too many elements and not enough space on my regular A2 card front.  I decided it looked like there was no way to go ahead with an A2 size , and I went for the 5X5 sized card instead. 
I thought I'd use a blue card base and place a white card front on top to set off the big blue diamond on the ring. I used the   The problem was it just was not working at all!  The Love Birds die cut did not seem to be elegant enough no matter that I'd cut it from Tonic Gold Mirror Card Stock.  The issue was that no matter what paper I backed the die cut in, it seemed too cutesy, inelegant, for this card.


So, back to the drawing board.  I decided that what I needed to do was to was simply use a die as with a Spellbinders Embossing mat to make a much more simple floral heart element and use that on the White Gold 65# Neenah Creative Metallic Card Stock.  The last bit was to round out the corners using my Crop-A-Dile Corner Chomper Tool.  I ended up using the "Mr & Mrs" die cut on the envie.  It was festive and still elegant after I tried my hand at calligraphy on the names and address. 


A bit of blue Organza ribbon (from a scrap that I'd had lying about) and it was completed!

Thanks for putting up with me and the side-ways photos!  Smiles,
Nina


Thursday, May 10, 2018

Finishing a project off with an embellishment of the right color.

When I was putting things away recently, I found that there was a card that I did not actually finish.  It was one I made with the Sizzix Diamond Clusters Die.  It is a shame that this die is a bit small.  I'd have loved it to be much larger.  Ah, well, no worriers. I've got a bit of time today to finish this up!

I couldn't find any paper to match the card base shade.  So, I resorted to using myWInk Of Stella Glitter pens (WOS).  There were two colors (#46 & #59) that were awesome and when mixed, they were just the right shade.  I actually even used my CutterPillar Glow Glass Mat as a mixing palette.   I've been temped to get the new Tonic Tim Holtz Glass Media Mat one because it is much bigger, but then I've already got this one.  The Butterfly die was one of the Sizzix Detailed Butterfly Die and Embossing folder Set.  This set has some very pretty embossing that was sorta lost a bit after the WOS pen was applied. The words were cut from an SVG alphabet set on my Silhouette Cameo 3. 


Tim Holtz shared on his introduction of his Glass Media Mat, that it could be cleaned by using any anti-bacterial hand sanitizer.  I tried this using a baby wipe and it worked like a charm.

Time to place the items and then it is done.  Now doesn't that look a whole lot better?

 
Thanks for visiting.  
Hugs & Smiles,
Nina


Monday, May 7, 2018

A Bridal Shower Card..

My dear Nephew is getting married to the girl of his dreams and I wanted to make some special cards for their two big occasions this coming weekend.  I just got  several of the Tim Holtz Sizzix 3D Embossing Folders.  I first misted the Neenah Classic Crest 110# paper in Solar White on front and back with water to soften up the paper fibers so they bend and don't break when run through the Sizzix Big Shot Machine that embossing folder does it's magic.  It is so incredible!  I am just very easily impressed, I guess.  If you could see the end result, you'd be impressed too.  
 Note:  Sorry, somehow, some photos in this post imported side-ways or even upside-down.  Yikes.  I tried and tried to get them turned around and then gave it up.

For the Bridal Shower, I used the McDies Love Couple Human Metal Die Cutting.  This link takes you to the current version of this die and not the exact one I used.  But, it is very close.  The paper I cut was from an old 6X6 DCWV Foiled paper pack.  
 
The card front was nice but there could still be more added to jazz it up some more.  I thought of using a scalloped stitched heart die cut and the die cut word "Love" or "Forever" or "Mr & Mrs" placed over it.   The scalloped heart die was cut from some HOTP Clear Glitter Adhesive Sheets .   I fiddled around with these last embellishments for a while and then, I tried to force myself to be done.


I set the card front onto a white 110# Neenah Classic Crest Solar White card base and a little bit of white ribbon tied off into a bow was all that was needed to finish it off.  Sorry, somehow, this photo imported upside-down.  Yikes.  I tried and tried to get it turned around and then gave it up.  You can still see how it turned out-sorry.
 
Afterwards, I thought of dressing up the envelope with an insert.  I used the Sizzix Straight Envelope Liners by Katelyn Lizardi.  These are terrific for adding just a little bit more to the make the card special.

I'm glad that I found these dies at Hobby Lobby and could use my 40% off coupon on them.  Most of my envies are A2 sized and they're the type which have a square/ straight folded section, so these Sizzix thinlits work well for me.  They do offer a variety that has a pointed folded edge and that may work well for others, just check your blank card envelope collection first.  I also like that there are a few celebratory words included to the set.

Finally:


Thanks for visiting.  Smiles-

Nina

Sunday, May 6, 2018

Masculine Birthday cards

Here is one of my first uses of the Tim Holtz Sizzix 3D Embossing Folders.  The one I used is called, "Mechanics".   One thing you must do, as per Tim Holtz, is mist the entire piece of paper with water to loosen up the paper fibers. But since, I was using foil tape here, the misting was not required.

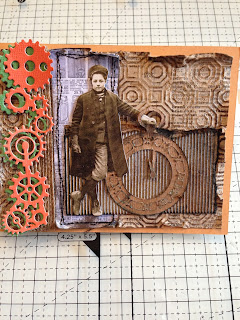
Below are all the items as I was inking and stamping.  I did have some ribbon, jute twine and corrugated paper from packaging and so I distressed that while I was at it.  I also used a different more geometric Octagon Darice embossing folder and then this was also distressed and crumpled around the edges.  I figured the beauty & all of the hard work in the foil taped, inked & embossed paper was going to get covered right up for the most part, so I decided to wait and use them later on another project where they'd show up more.  There was an odd bit of Canson 140# Cold Press watercolor paper that I'd used to spray a large clock die cut and I liked how that looked, especially since it had the book binding top edge-very retro. 


Then,  I used Tsukineko StazOn Jet Black ink to color the entire piece of the embossed thick paper (Neenah 110# Classic Crest in Solar White.  I also used some of the Ranger Adirondack Alcohol Inks in Pool and Espresso colors to add some extra depth.

I also used an old SpellBinders M-Bossabilities Embossing Folder.  I do not think it is still available online.  There are others out there that are similar and will give the same retro industrial look. 
Here is the end result of all my inking and embossing.  Not half bad, eh?
Then, I set about stitching around a little bit of paper from the Dapper Collection by Tim Holtz.  I decided to get out my pack of Tim Holtz Idea-ology Paper Dolls  and use a couple of them for once on a project.  Seems I just like to collect things and not actually use them.  Does that statement describe anyone you know?
  I also stamped the Party Hat from the  Tim Holtz / Stampers Anonymous "Happy Everything Blueprints" cling stamps.  I've had these for ages and they are no longer sold online (except on EBAY).  The link is going to take you to the Stamper's Anonymous/ Tim Holtz's newer collections and I'm sure you'll find a similar Birthday themed blueprint stamp there that you can use.
I may end up putting those images inside the card.  It may be getting quite busy on the front.
I inked up and frayed up the edges of the papers and started the stacking to see how the cards best came together.    In the end, I used a few of the things I stamped / inked up and I did not use some others.  I am never certain what the card will look like till it is finished.  Now, for the sentiments on the inside, I had to scour my stamp collection to find some saying to go well with the vintage look/ feel of these cards.  One sentiment was from the message about Time as a companion... from the Tim Holtz / Stampers Anonymous "The Journey" cling stamps.  There were also some Idea-ology Tim Holtz "Elements" Remnant Rubs that I used for the rub -on of the hand and stars.   I did find some words that I used on the one that is for my Nephew's Birthday "Wish" and for the word, "Big" I used my trusty ole DYMO Office Mate 11 .  Here is how it turned out:


 This is the other bonus card. I used some Offray "Jute-Yute" 5/8" Ribbon to add more texture to this card and the Boy Paper Doll was just the right height to hold the top of the big watch which I had cut using my Silhouette Cameo #3 and inked a long time ago.  I'm not going to add a sentiment here because then it'll be available for me to use for many occasions.
I have to say, I feel like this blog is just like winking in the dark, I know I'm doing it, but no one else does!  I'm not really sure why I even bother to post anything, but it is good to keep busy and share a bit of my hard earned knowledge back to the crafty community online from whom I've learned so much! The only traffic I've seen on this Blog has been from a sweet dear kind gal who visited it from the CTD that I had entered last month, so I am entering again with this creation.  Since, I want to enter it in the Color Throw Down (CTD)  #491 Challenge, I'll now have to doctor it up more and use the colors they are asking for this week.  These colors are craft, coral-orange, white and green.  I do want to enter the challenge and I do have some Joy! Crafts Gears Border Dies that can be complimentary to this design.  I think the colored gears add just the right amount of pizzazz.   DO go by their website and try some of the challenges --it'll get your creative juices flowing!
That's it for the Masculine cards for today!  Time to go garden.

Hugs,
Nina

Claiming it on Bloglovin

<a href="https://www.bloglovin.com/blog/20588129/?claim=snqscfx3kga">Follow my blog with Bloglovin</a>