Friday, February 22, 2019

Background dies Rule!

Hello, friends, Thanks for joining me here on the blog.  Here are the cards I've made today:


This one has a bit more going on as I wanted to add a little die cut to match the flowers in background die.


Here is the die that I used and it was so fun to flip it over and see "the reveal".   It is so intricate and amazing.  I used some heavy 80# Neenah Classic Crest paper in Solar White.  I find that the more intricate the die, the more benefit I get from using heavier paper.  


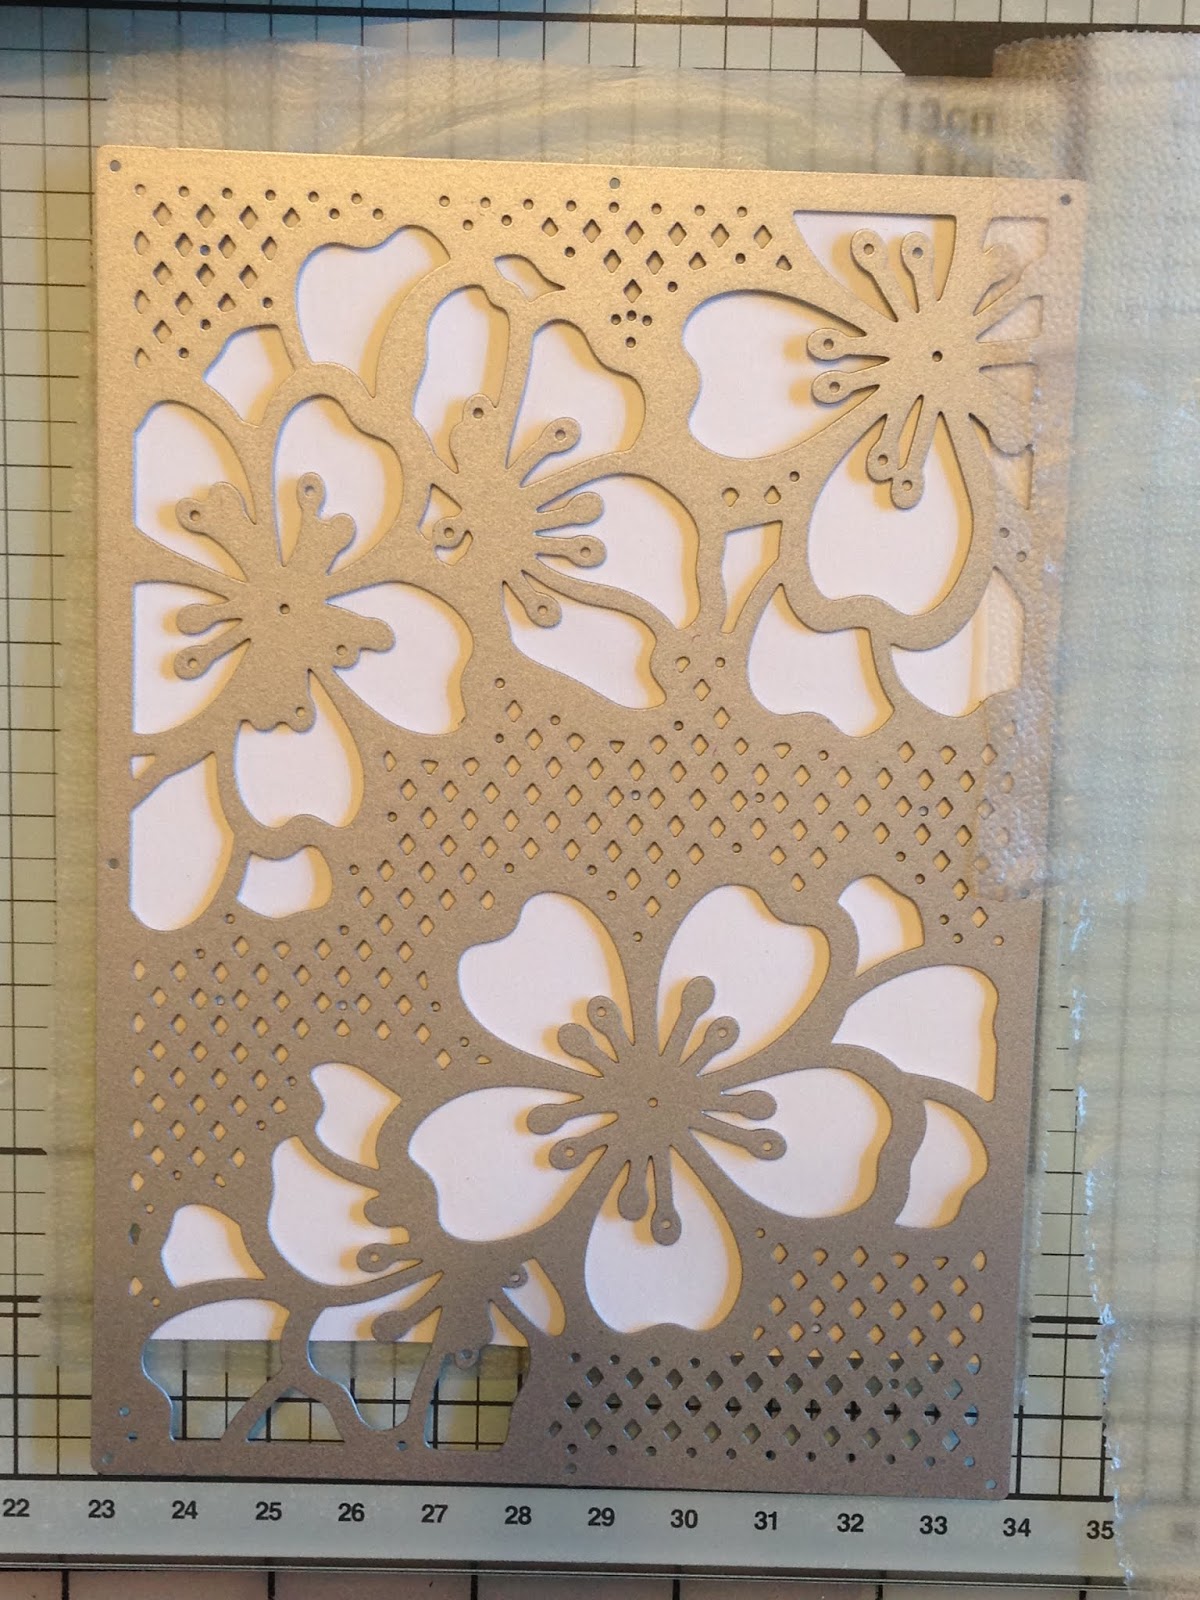
I then placed a bit of Glad Press N Seal over the front; such that when I flipped it over, all of the tiny pieces stayed in place.  I'll use this for replacing the little itty-bitty white card pieces onto another die cut background for another card soon.


Now, to glue down the die cut piece.  I tried a few of the glue pens that I own to see which would work best.  It turns out, the Nuvo Glue Pen works the best to apply over the back of the paper but not show up on the front at all. 


I dug around my craft room and Eureka!  I found some previously sprayed paper from 7 Gypsies that has just the right amount of detailed design and the right colors too!


OK, onto the stamping.  I liked this stamp by Stamps by Me called "Get your Happy On".  I don't think they still sell this one, but there are many other nice sentiment stamps available there.


 I heat embossed the sentiment onto heat resistant vellum using my Hampton Arts Stamp Positioning tool.  This one is smaller than the one by Ranger in Black Sparkle so I reach for it more often.  I also usually like a bit of sparkle in my cards so I have a few Black embossing powders which contain mica or glitter as seen below.


It is hard to capture the dark glitter-ness of this powder on camera but if you look close, it is super shiny and sparkly.
                                  
This is another favorite from Stampendous PearLustre in Hematite.  It is just the right amount of sheen to a project.


Because of how it is such a bold image, it didn't look so great when I simply stamped it once using the Versafine Ink in Onyx Black.  So, then I stamped it again as it was already set up in my Hampton Arts Stamp Positioner.  This helped a great deal and it was a much better image.

You'll notice that the dot on the exclamation point is missing and so I just filled it in with a fine tipped Sharpie pen.
Now to stick the vellum onto the card front.  I did fuss about for a long time deciding where to place the words, I ended up placing it near the bottom of card. 
The very best vellum adhesive in the world is made by Plus.  You won't believe how it just disappears behind the vellum on all manners of card stocks.


This is the cute little Memory Box Perky Poppy flower die.  Love how sweet it is when cut out so, I cut it out twice and then one die cut can be backed with that same sprayed background paper that I used on the card front. 


Here is the way the cards turned out:


Challenges I'll enter that fit today's cards:
1)  Crafty Catz #450
Crafty Catz

2)  CAS on Friday #152
CAS on Sunday

3)  Simply Create Too #146
Simply Create Too Challenge Blog


Thanks for stopping in and see you around.

~Nina

Thursday, February 21, 2019

Update: My Nuvo EM problem Solved and a quickie card

Hello all,  Here is the preview of the card I made today:


I'd like to begin by thanking the great folks over at Tonic Studios/Nuvo.  They responded to my email by offering to replace all the crusty dried out Embellishment Mousses that I owned.  All 13 of them.  The new packaging has a foam insert instead of the cardboard (of prior years) and hence they stay "wet" and soft, pliable, like mousse for a lot longer. I'll also just open them as I need to and save them from drying out too quickly.   Plus, I've already got a swatch sheet for these colors so, I don't have to open them right away.  I also found an item in my kitchen that may save the day ... Good ole Glad Press N Seal plastic wrap.


I can't tell you how useful this stuff has been in my craft room as well as my kitchen!  I decided not to pitch all the old Nuvo jars into the garbage , but to continue to try and work with them.  I placed some water into the jars and then sealed the jars with the Glad Press N Seal wrap {in addition to the foil that was already present}.  I'll check them in a few days and report back on my results/progress of reconstituting the mousses.

Now, onto the quickie card.  I have a SIL that has a Birthday soon.  I have wanted to use these 3 new Cut an Emboss folders from Crafter's Companion.  They are not a new concept, just new to me; I thought I'd give them a try.  I always spend way too much time creating mini works of art that most people probably just pitch out after looking at it for 15 seconds.  So the quickie card concept was born in my crafting space.

After the first pass through my Big Shot Machine, I discovered that I had put the card stock in backwards such that I got a Debossed image on the card front, not an embossed image.  I then went through and labeled each of the folders with "Front" just so it'd be crystal clear to my muddled brain next time.  Of course, after I did that, I saw that the image was printed in a vibrant purple color to indicate the front of the folders!  


So, onto the card front.  I selected the simplest Cut & Emboss Folder and a piece of 80# blue card stock from my stash. 


Next, I backed the opening with some 65# Solar White Neenah paper.  I have a ream of this stuff and use it often in my crafting.  Then I decided to stamp with this old Birthday Wishes Stamp set from Stampin Up! 

                                       
I used VersaMark ink and heat embossed the sentiment "Happy Birthday" onto the center circle and included a few of the flowers too.  

                                                       
Then I colored those in with the new 8 Stampin Blends Markers that my sweet little niece got me for a Christmas gift!  Her mom, my beautiful, crafty SIL told her which colors to buy for me as she wanted me to have the colors that would best be used in flowers!  Now, unfortunately, I've got to go buy the rest of the colors!


Afterwards all it needed was a couple of flowers from my stash.  A long while ago, I sprayed many tiny bunches of white Paper Rose flowers with my Lindy's Stamp Gang sprays.  I still use these quite often.  If you want a time saving tip- do this and then you'll always have a few in your stash.  The colors may not be exactly the ones you're going to use in your card, but as I always say, "close enough is good enough". 


This is the (fabulous, IMHO) end result:  


Now, one of my New Year's Resolutions was to enter more card or Scrapbook Challenges.  I'm going to go online and see which Challenges are going to work for this simple basic card.


Modsquad Challenge


addicted-to-stamps-challenge


Fusion Card Challenge


Crafty Creations Challenges


Ok, thanks for stopping by.

Hugs,

Nina


Claiming it on Bloglovin

<a href="https://www.bloglovin.com/blog/20588129/?claim=snqscfx3kga">Follow my blog with Bloglovin</a>