Saturday, November 3, 2018

Using a Fun Stained Glass Cover plate Die for two PITA Christmas Cards

This morning I wanted to use these new Stained Glass Cover Plate Die that I got from Catherine Pooler Designs.  I've been waiting to use this for just the right cards.  It is so pretty! Pictures just don't do it justice!


I cut it out but, I did not recall how to set it up so that the die cutting sandwich with paper backed with adhesive tape in my Sizzix Big Shot, so, I had to fuss about for a long while making these cards. This was the first of many Pain in the Ass (PITA) aspects of these cards.  I carefully removed the die with all inset pieces intact.  


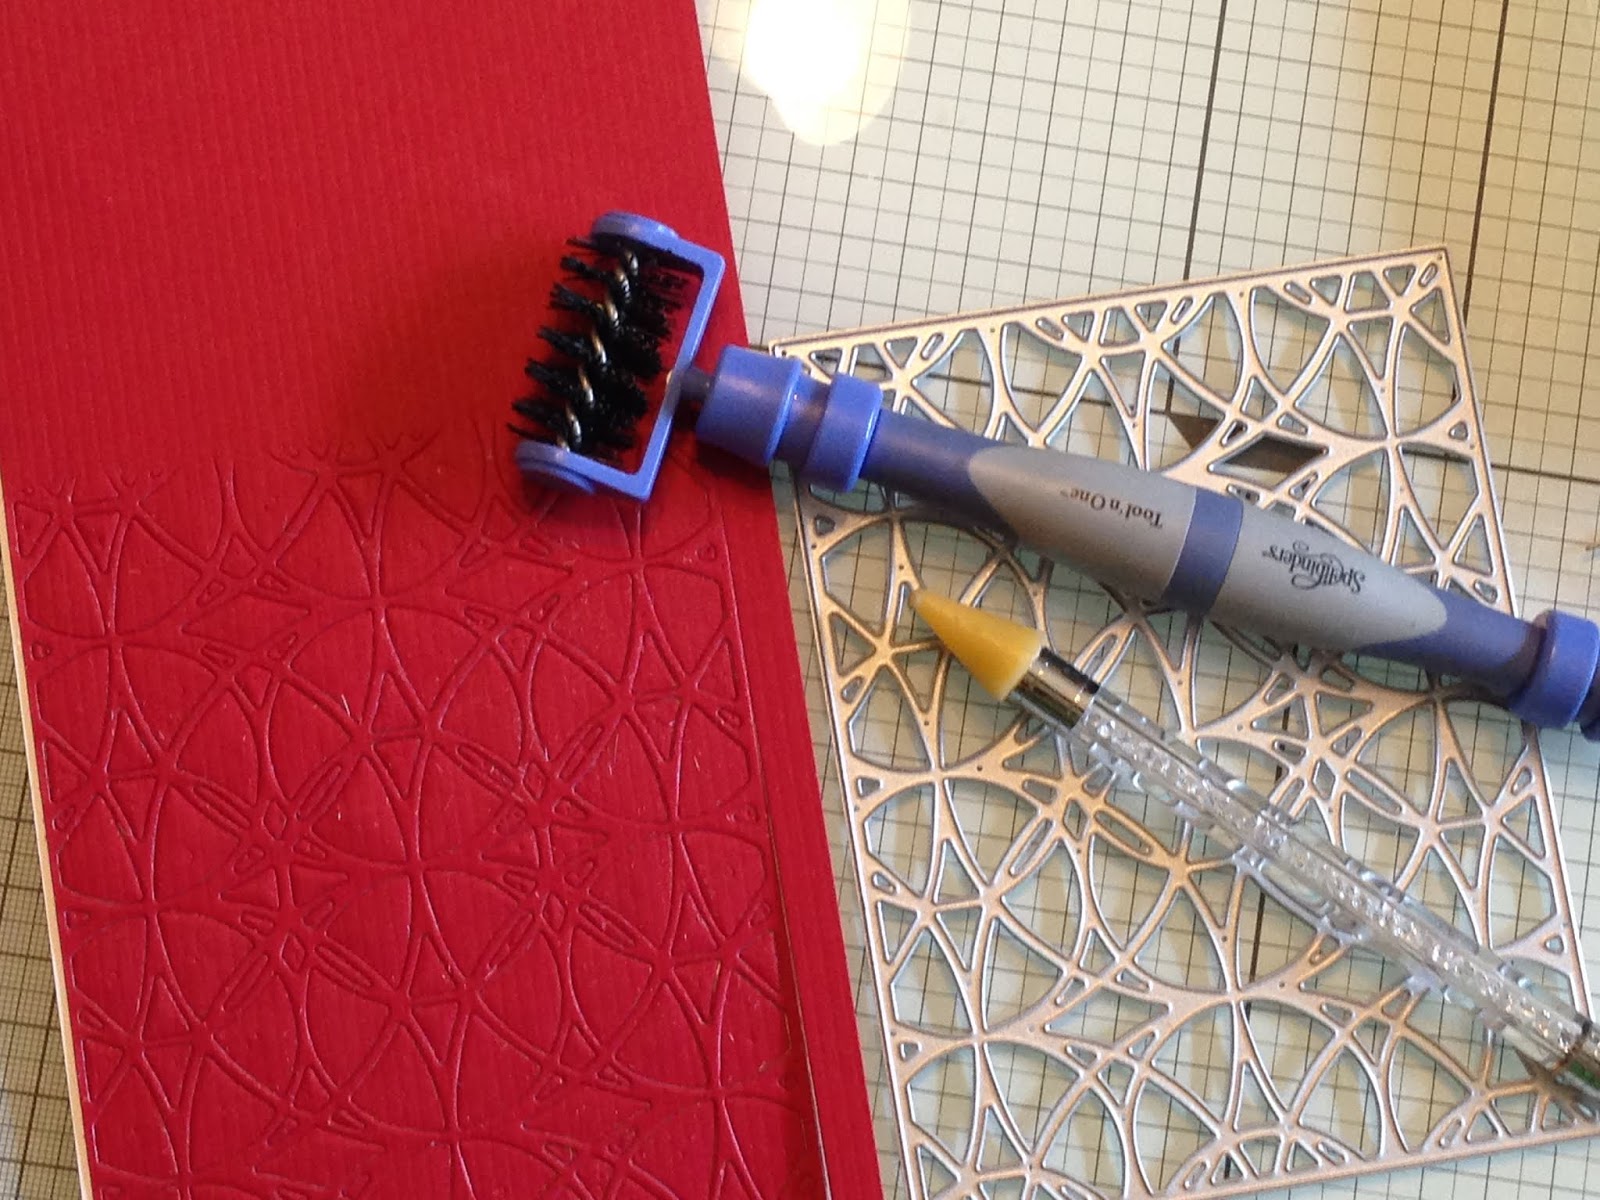
And then I had to glue each and every one in place on the white card base!  Oh, ugfft!  Never again; as there were so very many pieces and so many teeny tiny ones!  Talk about a PITA!


I used a liquid glue - Tombow Mono Aqua Liquid Glue.  This was such a PITA (Pain in the Ass), so painstaking and such tedium.  Then, I placed the whole thing up on the card base to stick down the little bits!  It did not work as well as I thought it might!  But, I did not give up! 


The glue wanted to stick everywhere!  It was a royal PITA, and it kinda made a mess, but it worked out finally.  


One or two pieces flew off somewhere on my desk and though I searched and searched for them, they were gone.  I had to then just use another similar piece of red paper and cut out the missing pieces.  That was a PITA also.  Keeping count?  That's five PITA endeavors so far.  


I think I got all the tiny pieces glues down properly.  The other card was looking a bit anemic.
It really needed something, though I did not want to cover up the beauty of the cover plate's cut image.  Hmmmm, what to do?


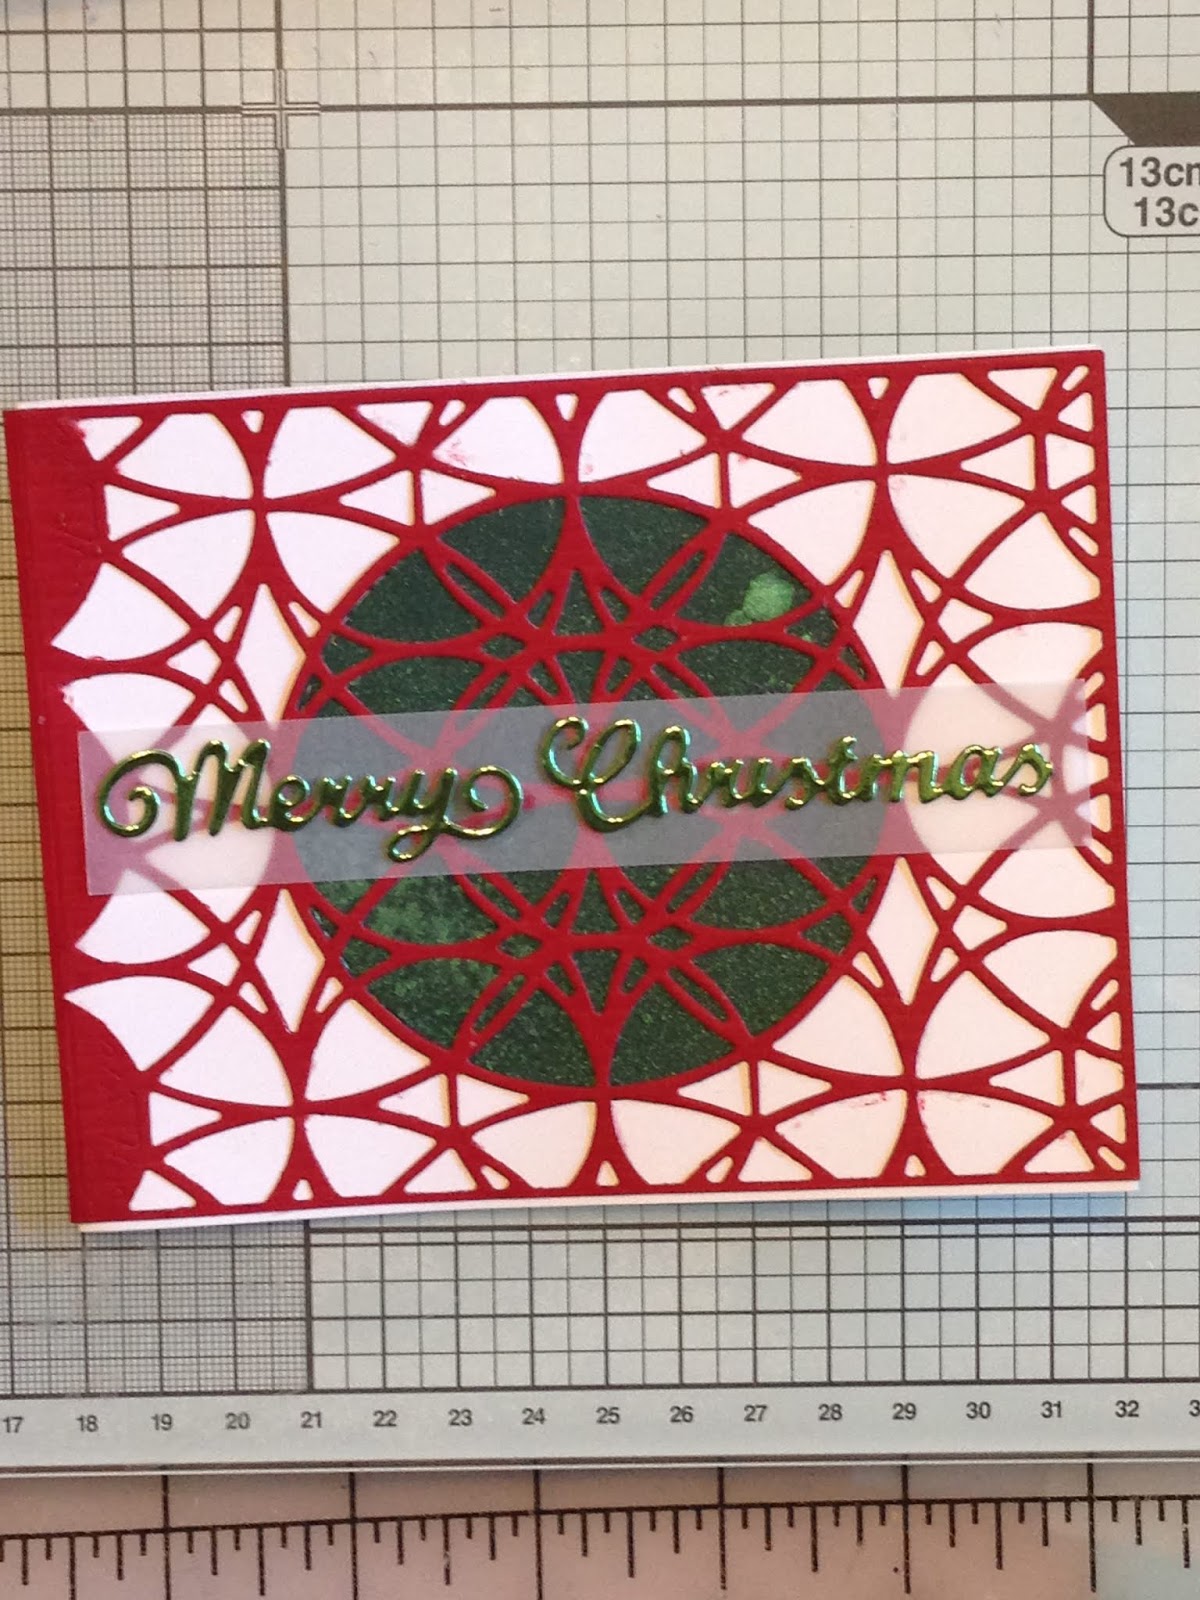
Next, the green paper that I had previously sprayed with some Lindy's Stamp Gang Spray in Sea foam green glitter mist.  I tried to use it behind the entire front, but it was too much.  Then, I saw a central circle in the die and using a matching circle die, I placed it behind the main central circle of the cover plate die cut.  When I placed it in front of the cover plate image, it just looked off.  But, putting it in back of the main circle; really dresses up the card front.  


Now, another bit of PITA effort to glue down the cover plate die cut onto the green circle and then the white card front.


Ok, now for another PITA issue of cleaning up all the stray glue from the card front.  I used my Tombow Mono Sand Eraser.  This thing is great for rubbing off the stray bits of glue or red paper left behind when I moved about the cover plate die on front of card base.
I now went about trying to get the sentiment onto the front.  I thought that this  "Merry Christmas" written into the swirls of a Christmas tree die would work well.  It just did not.  It seemed to get lost on the very busy front of the card.


One trick I know of using when things get too busy on the card front for the sentiment is to back it on or use vellum.  This way it is not competing for you attention with the back ground.  This was the ticket!  I did have to cut off the swirl at the end of the sentiment so it would fit across the card front.  Also, I turned the card around so it would open horizontally, instead of vertically.  That allowed the sentiment to fit better across the front. 


Yeah, one down, one to go.  Since the vellum trick worked so well, I used it again.  


I decided to go ahead and use the remains of the previous die cut to add the Christmas tree to this vellum circle.


That's it for now.  See you again soon!
Hugs,
~NIna


Friday, October 26, 2018

Fa la,la la Llama-- More Christmas cards.

Well, here I am again with more cards for Christmas.  I have found this stamp set so adorable that I just had to try it.  It is called "Festive Llama" and it is from Pink Fresh Studios.  It is the cutest!  I did not get the die set because I figured out that it is easy enough to cut out by hand.  So old school, I know.  The main reason I bought this is the "Fa, la, la llama" sentiment, which is so adorable!

After stamping it out in Momento Tuxedo Black ink, I set about coloring the images.  For this I used many of my favorite coloring mediums.  The first idea was to use KaiserCraft Gel Pens 36 pc. set.  


Then, I decided to break out my old set of Derwent Inktense Watercolor Pencils36 pc. set.  These are awesome! I so wish I had bought the 72 color pack.  


My last item was the 20 set of watercolor brush markers.  Cheaper than Zig Clean Color of which I own many, but not the big 80 pc sets.  Maybe, I'll ask for it for Christmas.


Now I just cut out all the sentiments that I had stamped out.  I used the nested circles with dots or crosses and the wonky stitched rectangles.  Most of these sets came from MFT Die-namics.


Ok, now to put these cards together.  I fused about quite a bit to see how to do it.  Finally, I came up with three cards that were pleasing to the eyes.  I used some Stampin Up Designer paper from last year and othjer paper from my stash.  Cute?  I thought so, and I hope you think so too.  


Nice, right?  I'm getting faster at card making and blogging.

Hope you can come around again.
~Nina


Friday, October 19, 2018

More fun with "Santa's Suit".

There was enough of the colored in die cuts left over from my project of yesterday using "Santa's Suit" to make another two cards.

I saw a similar card somewhere on the internet and I loved the mobile Santa reaching for his clothes on an actual clothesline.  I thought it out and came up with this method of making this card:

Firstly, I am going to color the back ground paper.  I used a couple of colors of Tim Holtz's Distress Oxide Inks.


Greens for the grass and Blues for the sky.


Then, I cut out a notch for him to glide/slide along.  I used an old dotted nested rectangle die set and the smallest one was just the right size.  So lucky!


Now, the trick is to elevate the entire front of the card so that Santa can slide along the track.  I used the 3M mega roll of foam tape.  I bought this 36 yard roll over three years ago and I love that I don't have to scrimp and save but I can just use it with abandon!  I actually take a bunch off and place it onto a smaller roll that is more handy.


I also used the foam tape on the back of all the items that will be hanging off the clothesline.  There is a trick to the slide portion too, that I must mention.  The slider can just be any scrap of paper folded to be thick but the edges of the slider track must be powdered a bit to prevent the slider from sticking to the foam tape.  The rectangle cutout is placed in back so the scene looks seamless.  Santa has two pop dots on his back that will attach to the sliding guide scrap piece of paper.


Opps, I almost forgot, the clothesline will need to be taped across the front.  I had to peel back the front and secure with some liquid glue.


The last step was to make the clothespins attach to the clothesline.  Ugh, what tedium.  But, they did turn out super cute, so it was worth it.  Here is one of the cards.


The other one: 


I'll just finish them up with the sentiments and they are ready to go.
Thanks for visiting and see you again.

~Nina


Thursday, October 18, 2018

Santa's Suit Christmas cards

I happened to come across these cute stamps and dies from Stampin' Up called Santa's Suit.  This set is no longer available at Stampin' Up but the link will show you that they do have many cute new stamp and die sets for this year.   Firstly, I just stamped a bunch of the images onto some of my favorite Neenah Classic Crest Solar White 80# card stock and cut out a few using the dies.


Then, the cardstock I used for the card bases was assembled. This is just some old Bazzill 80# cardstock from my stash.


The mouse pad that I use on my desk is an actual circle and I stamped the clothes carefully to hang off the clothesline made using the perimeter arc of this mouse pad!  
The next thing was to stamp in the clothespins.  Bow what a chore that is!  Then I colored the clothespins with some Zig Clean Color Watercolor Brush Pen in brown.


So, now for the putting together of the various cards. It would have been so much easier if I had just glued these onto the card fronts, but, then again, I'm not anything if I'm not complicated! I found this pack of Speciality Stampin' Up Christmas Holiday Fancy Designer Vellum paper.  It's from last year, so you'll have to get it on EBay.  I love it!  

I used a few other dies that I had around to cut some snowflake borders. I've been collecting dies for a long time and so I have many to choose from.  I used some HOTP Clear Sparkle glitter sheets and regular Blue paper too.  


Here are the finished cards:


Not too shabby, right?  6 cards so far and I still have some die cuts of this set left over.  I'll be back to make more cards later this week.

Thanks for visiting.
Nina


Friday, September 21, 2018

A Couple of Sweet New Baby Cards.

We've got a new little one (a baby girl, Emily) who has arrived into our extended family.  One of my Nieces, Sara, has just had this sweet little bundle of joy.  I therefore, am making a couple of cards  to send one to her and one to the next new Mama.

The stamps I wanted to use were bought just as soon as I learned Sara was pregnant!  They are Stampin Up "Born to be Loved".  As these are no longer in the current line up of the Stamp Up product catalog, you'll have to use a substitute.  I simply heat embossed the large heart sentiment in gold onto 65# white paper.


The next step was cutting out the watercolor stripes die from Alt e New.  I used a colorful piece that I had previously sprayed with various Lindy's Stamp Gang Spray Mist colors a while ago.   I also found a duo-toned piece of paper that matched the colors so well, I used that as the card base.


Then I thought of using some specialty paper for the frame of the stamped sentiment and a neat (MFT or LF?) heart shaped die.  It was really just a line of hearts in a heart shape so then I had to cut it twice to have the hearts on the edges show up!  


Ugh, look, in the picture above , you can clearly see that it'd be a thin line of hearts!  I need to look more carefully at where the edges are on the dies before I use them on the stamped paper!  I decided to use the ECD Specialty Mylar Shimmer Sheetz in gold.  


I then began assembly and gluing down the elements to card fronts.  One of them I left without any sentiments as I can then use it when needed for a wedding shower or some such event in the future.  Here is how they turned out:

The other card I did add the sentiments; for the new baby Emily's Parents.  Now, I'm off to write a check & send it out!


Thanks for coming by.  
Hugs, Nina


Thursday, September 6, 2018

A Christmas Card & CTD #509

While I had my inks out and the stamp sets available, I thought I'd enter one of the cards into the CTD#509 Color Throw Down.  The colors for this week are orange, red, & blue.  this may be a strange combo for my Christmas cards, but why not?

I started with a dark Blue card base and added the white paper embossed with the stars in Delicata Pigment Ink in Golden Glitz.  I placed the card base onto my Hampton Arts Stamp Press and use the Simon Says Stamp Christmas Circle Sayings  stamp set to place the sentiment onto the card front in Stampin Up Cherry Cobbler ink.


I then stamped the images from the Stampin Up Night in Bethlehem stamp set into the circle.  I tried to cut the edges of a post it note to cover up the parts that I'd already inked and it sorta worked.  The darn post it note was too thin and some of the ink bled through!  Yikes!


So, I ended up stamping and cutting another of the images from this stamp set to cover up this boo-boo.  I picked the two travelers and the donkey image to mostly cover up the mess.  Yeah!  


The final result which I am submitting into the Color Throw Down #509 this week:  If you haven't been to their blog, you really must go and check it out.  It is very easy to participate and fun.


Hugs, Nina

Claiming it on Bloglovin

<a href="https://www.bloglovin.com/blog/20588129/?claim=snqscfx3kga">Follow my blog with Bloglovin</a>